Categories
Professional-Organizer

Week 13 | Yard Junk | 52 Weeks to Downsize & Minimalize

Join Bella Organizing to downsize & minimalize yard junk and get the front, back, and side areas of your home looking good again. Keep reading to find tips and resources for getting yard junk reused, recycled, and even hauled away for free. Many of these resources are available throughout the USA.
junk-yard-downsize
 
What is Yard Junk?
  • Lumber scraps that have rotted and decayed
  • Wooden logs hanging around when you no longer camp or have a working fireplace
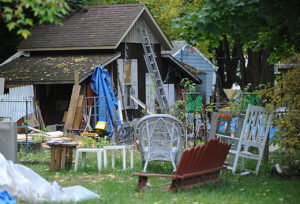
  • Broken sun umbrellas
  • Rusting patio furniture that has been through too many seasons
  • Outdoor toys no longer played with
  • Landcaping supplies that have gone unused
  • Fencing and chicken wire that serve no purpose
  • Dirty, empty pots and planters that snails call their home
  • Unknown objects hanging from trees that were once decorations
  • Broken outdoor holiday lights still strung along the house and fence
  • Bricks, cinderblocks, and other building and landscaping materials that have been laying around for too long with hopes that “someday they’ll be used”
What other yard debris are you ready to kick to the curb? 
Resources for giving away and recycling yard junk

Resources for local yard junk pick-up services (be sure to read the details of what they DO and DO NOT pick up on their website.)

  • Many waste management companies offer residents one free, annual bulky waste pick-up in addition to your regular weekly trash/recycling pick up. Contact your local waste management company for details. Here are examples for Oakland and San Francisco.
  • Local trash haulers, such as 1-800-GOT-JUNK and Junk King (fee-based). There are LOTS of companies to choose from. Do an Internet search for “junk-hauling companies” near you.

urban-ore-yard-junk-downsize-minimalize

Local SF BAY AREA companies and organizations that accept donations of various types of yard junk (you drop off):

nails-wood-yard-junk

SAFETY TIPS

  • Use heavy duty gloves and face masks when handling yard trash, as there can be nails and splinters in wood, mold, bugs, and other yucky stuff lingering on and under these things.
  • When giving away items online, there are inherent dangers of inviting strangers to your home. Always play it safe and take precautions.
  • There are many junk haulers who are not legitimate, law-abiding companies. Beware of local scams in which you pay a hauler who illegally dumps instead of dropping it off at a local city dump. You can be held accountable and fined if someone is discovered to have illegally dumped property that belongs to you, even after it is hauled away from your home or business.

Bella_Organizing_Best_Professional_Organizers_San_Francisco_Oakland_Berkeley_silicon_valley_montereyIsabella Guajardo, founder and owner of Bella Organizing, is a San Francisco Bay Area professional organizer offering home organizing, interior redesign, and residential move management services throughout the Greater San Francisco Bay Area. Call (510) 229-7321 or email info@bellaorganizing.com for more information. Gift certificates are available.

Follow our projects on: Facebook | TwitterInstagram | Houzz

Counties we serve:

Alameda | Contra Costa | San Francisco | Marin | Sonoma | Napa | Santa Clara | San Mateo | Santa Cruz | Monterey

Categories
Professional-Organizer

Week 4 | 52 Weeks to Downsize and Minimalize | Photo Edit

There are valuable memories worth saving, and a lot of bad shots taking up valuable space. Paper photos quickly become clutter stuffed into boxes and drawers if not organized into albums. Digital photos (and video) take up space on computers and smart phones, and make devices run slower unless you back them up externally and delete them from your device. Minimalize paper and digital photo clutter in your home and on your computer by taking these steps.

With the passing of time, you develop a fresh perspective of what photos look good and do not, and what you want and don’t want to keep. This week’s focus is to 1) purge unwanted photos, and 2) take steps to organize the keepers.


  • Start at the beginning. Look through the photos from the beginning of the digital history on your smart phone or computer, or grab a handful of loose photos and start sorting through them (handle carefully or wear clean gloves to avoid getting dirt and fingerprints on them).
  • Purge and delete. Here is a list of photos worth downsizing:
    • blurry shots
    • bad composition
    • dark lighting
    • duplicates (multiple shots of the same pose or facial expression)
    • scenic pictures of which you no longer recall the location
    • photos of people, places, or things you no longer care to remember
  • Downsize first, organizing next. If you have a lot of digital photos to go through, focus on purging first, then put detailed labeling into albums and individual photos later, or else you may become overwhelmed. Deal with paper photos similarly, placing the keepers in stacks according to a general date or event. If you plan to scan them, purge and organize first, digitize later.
  • Mark favorites. Many digital photo storage programs (such as iPhoto) have an option to “star” or mark favorites. Do this as you go (and as you take photos in the future) so that you can find them faster at a later date. You can also mark favorites to print or email. If marking paper photos, use a post-it note or separate envelope to sort and label favorites.
  • Store photos safely now and forever.
    • Create one main folder labeled “Photos” on your smart phone or computer (the Mothership). This is where all your photo albums/sub-categories are kept. Your phone or computer may already come installed with a photo organizing application or program. Take advantage of it! From here it will be easy to organize, label, find, and back up photos.
    • Create new albums as you take new photos, or file new photos in existing albums. Albums I have in my phone and computer are “Friends” “Family” “Fig and Newton” (my dogs) “Home & Garden” “Bella Organizing” (work-related), and various labels according to the event.
    • Use acid free photo boxes or photo albums for paper photos. If an acidic product comes into contact with photos or paper, the acid can migrate and cause permanent damage and decay to your valuables more quickly than they would naturally. This is why it is important to use good quality Acid Free and archival materials for the preservation of treasured memories.
    • Use an SD card or thumb drive to transfer smaller batches of photos to safer digital storage. I don’t suggest saving photos using these small devices, as they can easily become too many storage places, and get lost. Use SD cards and thumb drives to transfer photos from one device or computer to another quickly, with the goal of getting photos to the Mothership for safekeeping.
    • Two moms are better than one. Send a copy of the photos on your computer to a larger, heavy-duty external hard drive. From the external hard drive, a third copy can be transferred to online/cloud storage (optional.)
    • Scan and save paper photos digitally on a cd that you can then upload to your computer, an external hard drive, and/or online (cloud) storage. Read Consumer Report for reviews of the latest desktop photo scanning machines. Mail away options are available for large batches of photos, some of which are listed here. Always read reviews and use local companies (don’t take a chance that your special memories will make it through customs in order to get a better deal from a foreign company.)

No storage system is 100% foolproof. Keep organized copies of your digital photos in 2-3 places AND paper back-ups of your most precious ones.

Photo Display Tips – see and use what you have

  • make a collage of framed photo memories on a wall or store in a digital photo frame that rotates and displays hundreds of photos at a time
  • Save favorite photos as phone or computer wall paper
  • Link photos of people to their information in your phone’s contact list
  • Companies like Costco offer less expensive and high quality transfer of home movies and slides to DVD, printing, mounting, photo repair, and album creation services.
  • Read 27 unique display ideas for paper and digital photos from Buzzfeed.

Bella_Organizing_Best_Professional_Organizers_San_Francisco_Oakland_Berkeley_silicon_valley_montereyIsabella Guajardo, founder and owner of Bella Organizing, is a San Francisco Bay Area professional organizer offering home organizing, interior redesign, and residential move management services throughout the Greater San Francisco Bay Area. Call (510) 229-7321 or email info@bellaorganizing.com for more information. Gift certificates are available.

Follow our projects on: Facebook | TwitterInstagram | Houzz

Counties we serve:

Alameda | Contra Costa | San Francisco | Marin | Sonoma | Napa | Santa Clara | San Mateo | Santa Cruz | Monterey

Categories
Professional-Organizer

Six Simple Steps To Get Organized

rid-pet-hair-downsize-minimalize-newton
My boy Newton. He owns and loves but a few simple toy, but we have the most fun hiking together in the East Bay Regional Park hills.

Getting organized doesn’t happen overnight. 

It’s a process or a “lifestyle change” that develops and improves over time.  The more action you take toward an organized lifestyle, the more time you will have for family, friends, hobbies, life goals, and yourself. With faithful practice, you will become more organized. Here are six simple steps to get you started:

  1. Pick a zone
  2. Make a list
  3. Sort like items
  4. Give Away/Sell/Donate
  5. Organize
  6. Congratulate yourself

1. Pick a zone. 

Choose a room or area of that room where with a little decluttering and organizing you will get instant gratification. Don’t try to tackle the entire garage or house in one day…stick with a SMALL area of one room, such as one small closet or cabinet. Focus on getting this area completely organized just the way you want it. The positive feeling of SUCCESS helps to keep us moving toward our goals.

2. Make a list.

Prioritize projects to complete within that zone before moving on to another (1., 2., 3., etc.). For example, if decluttering and organizing a pantry:

  1. Pull out and compost old and expired food
  2. Wipe down shelves with a cleaning solution
  3. Arrange food into categories
  4. Make a list of food that needs to be replaced and/or organizing supplies to pick up that will help streamline the pantry.

3. Sort like items.

Do you have multiples of something you prefer to store in this zone in different areas around the house? Bring them together. Don’t stray too far! Stick with organizing this zone. Finding things that don’t belong here? Put them in a pile and find them a home later or drop them off in the general area that *should* be their home and leave them there for now. You’ll fine tune later. Get back to sorting your priority zone. Do a little dusting while here.

4.  Give Away/Sell/Donate. 

Gather paper or plastic grocery or trash bags, cardboard Amazon or moving boxes, and label them accordingly for Give Away, Sell, and Donate. Fill them with things found in this zone that you want to bestow upon someone you know and love (Give Away), things you would like to make money back on (Sell) and things you don’t want that aren’t worth the time to sell but still have a little life in them (Donate). Place a Recycle and Trash bin or bag nearby, in case you come across this stuff in the process. #4 is an optional but very important step to de-cluttering and downsizing. 

5.  Organize. 

Place items where it makes the most sense to you. Should everything in this zone be tidied up and left here or taken somewhere else in the house where it makes more sense to be? Did you find keys that should instead hang on a hook by the door, or go in a specific drawer in the kitchen? Did you happen upon a set of winter gloves that should go into a drawer in your dresser, or into each jacket pocket so they are instantly there when you need them? (I leave mine in my jackets and LOVE always finding them there.)

6.  Congratulate yourself for coming this far.

Great job! You completed organizing a zone. Now set up a date with yourself to tackle another zone and add to the accomplishments.

Isabella Guajardo has provided professional home organizing and residential move management services to hundreds of individuals and families from all walks of life including single parents, school teachers, college professors, lawyers, doctors, Pulitzer Prize winners, and CEOs of Fortune 500 companies. The thing 90% of them have in common? Too much stuff they were ready to downsize. Bella Organizing helps you to tackle and reach your declutter and organizing goals.

Call (510) 229-7321 to schedule a complimentary telephone consultation.

Categories
Professional-Organizer

Kitchen Organizing – Creating A Drink Zone

Create a “drink zone” in the kitchen that includes everything you need to make your drinks: coffee, tea, various drink mixes, sugars, honey, mugs, glasses, coffee and tea maker, blender, juicer…

I LOVE when people move! Fresh start! I get to design, set up and organize home offices, living rooms, bedrooms, kitchens. I always have so many IDEAS.

The first thing that needs to be put together is the kitchen. Of course you have to eat and drink coffee and tea in the morning. I put together a series of photos of what I call a “drink zone” from the last home I lived in. I work with clients on kitchen organizing regularly, so these photos give examples of what I’m always talking about with them.

An organized drink zone is a place to store everything you need to make your favorite “for here” and “to go” drinks: coffee, tea, and their implements, cocoa, various drink mixes (such as emergen-c), sugars, honey, mugs, travel mugs, glasses, coffee and tea maker, blender, juicer, etc. Keep in the upper shelves things such as platters and baskets that you will use for serving drinks or drink-related tools and accessories.

Decanting & Labeling

Everyday drink glasses should be placed on the lowest, most reachable shelf, and less commonly used glasses up higher. Here I used a chrome expandable shelf riser/extender purchased from a local home store. The cabinet shelves are adjustable, so I adjusted the area to have enough space to add the extender so that the glasses stack and a hand can comfortably grab and put things away.

kitchen cabinet organizing – everyday drink glasses (or mugs) on lower shelf

Lining kitchen cabinets is sometimes necessary. I like to line the lower, most commonly used dish cabinets. Why? Because it protects glasses from sliding around, from clanking and chipping on the cabinet, and it protects the cabinet from water damage if you put away things without completely wiping them dry. If you rent or are detailed about the resale value of your home, take care of the cabinets. One of my favorite’s is spongy no-slip liner because it’s easy to measure, cut, and place, unlike sticky liner. The brighter the liner color, the brighter it makes the inside of the cabinet, the easier it is to see what’s inside…works especially well in dark spaces.

Shelf liner protects the surface of your cabinets, adding to the resale value of your home.

We move up to the less-commonly used items…the wine and “special occasion” cocktail glasses. Alway have a small step-stool nearby for when it’s time to bring these babies down and par-tay.

Less commonly used glasses go higher up in the cabinet.
Love the tiki cocktail glasses.

We move over to the upper right where the coffee and travel mugs live. Six travel mugs is more than enough for two people.

Coffee and travel mugs.

Many moons ago I had a thrift store collection of cute mugs, but have since pared down to three: the skinny blue one with flowers that I love for hot chocolate, my little sombrero man, and my mama buzz mug. Mama Buzz was a hip local coffee and sandwich shop on Telegraph Avenue in the Temescal District of Oakland back when I first started this business. They were popular for showcasing local art & music before First Friday’s began. It’s since changed hands and is now a beer garden and bustling social hub during the First Fridays Art Murmur. Mama Buzz will forever live in my heart and kitchen cabinet.

My favorite mugs are simple treasures.

The lower-right side of the cabinet is where the coffee, tea, honey, sugar, mexican hot chocolate, mulling spices, emergen-c, coffee filters and drink implements live.

Coffee and tea drink zone.

I like to store loose leaf tea and bags in small, stack-able mason jars where they keep fresh longer and are easy to see. I simply cut the label off and place it in the jar so we can see and read what it is, and know when it’s time to buy more.

Store loose tea bags in mason jars to keep them fresh longer.

The counter top below is specifically for drink-related machines and gadgets: the electric water kettle and coffee maker. The large cabinet below the counter houses the juicer and blender which are too bulky and heavy to keep on the counter but used often enough to store nearby.

I keep mint with its roots in a glass of water by the sunlight to pick when I’m craving fresh tea. Mint is invasive in the garden, so pulling a little out at a time by the roots will keep them thinned. There’s no better tea than fresh mint tea. 

Fresh mint ready for picking.

This is our kitchen drink zone. We add to it only when things break or run out, so that it doesn’t get cluttered. We keep in it things we love, cherish, and use regularly…things that make us happy when we open the cabinet and see them.

Kitchen cabinet organizing – drink station

Ready for more? Call (510) 229-7321 today to schedule a complimentary estimate for your kitchen and pantry organizing goals. Gift certificates are available.

Keep up with Bella Organizing on Facebook and Instagram.

Categories
Professional-Organizer

How To Fold and Organize T-Shirts

I get lots of questions from clients for tips and techniques for keeping clothes organized in closets and drawers, including ways to handle the oodles of t-shirts collected from concerts and work conferences.

Does this t-shirt drawer belong to someone you know?

Here’s what it can look like in just 20 minutes:

A tidbit of information I share with clients during a closet organizing consultation: The way items are hung and folded makes a HUGE impact on how neat they look, accessible they are, and HOW MANY will fit into their allotted space. For more about hanging clothes, see my CLOSET ORGANIZING BLOG. For now we’re going to focus on folding and organizing t-shirts.

Simple steps to neatly fold t-shirts:

Let’s start. Choose one t-shirt and lay it down on a flat surface. Smooth out any wrinkles.

TIP: Cotton t-shirts have less wrinkles when fresh out of the dryer. To quickly de-wrinkle, pop them in for 8-10 minutes on a medium or high setting. Or iron them.


Next, choose what side of the t-shirt you want to see when folded. This will help the owner to know what’s what so she can go right to it in the drawer. In this case, we want to see the front design of the shirt since there’s nothing on the back.

Once you’ve chosen the side of the t-shirt you want to see, put that side face down.


Next, fold one side of the shirt over.


Then the other side.


Then do one nifty little fold at the bottom (about 4 inches).


Next, fold the remaining of the shirt up in half.


Then fold that up and in half once more.


Turn it over, and you have a neatly folded t-shirt!


Now he looks good enough to join his friends.


Let’s do this one more time.

Choose a t-shirt. This is the backside, which we want to see once folded:


So we turn it over, and start folding on the side we don’t want to see.


Fold one side over.


Then the next.


Fold the bottom up about 4 inches (give or take, depending on the size of the person. We’re working with a men’s size large here).


Next, fold the remaining t-shirt up in half.


Then fold that up in half again, turn it over, and you have a neatly folded t-shirt.


Place t-shirts back in the drawer by color or style, plain or printed, whichever suits your fancy. You can also use baskets to store your neatly folded t-shirts on closet shelves or under the bed. Maintain the neatness of the drawer or basket by folding t-shirts in this manner when fresh out of the dryer.

Does keeping your t-shirt drawer neat and organized seem unrealistic to you?  Practice makes improvement. Getting organized is a process, a “lifestyle change” that develops and improves over time with regular commitment, much like eating healthy and getting physically fit. Organize a drawer or entire chest of drawers using the simple process of “zone” organizing I explain in this blog. I had a groovy time organizing this t-shirt drawer, thanks for visiting!

An organized t-shirt drawer


____

Ready for more? Call (510) 229-7321 today to schedule a complimentary estimate for your closet and drawer wardrobe organizing goals. Gift certificates are available.

Keep up with Bella Organizing on Facebook and Instagram.