If someone you know is going through a serious collecting or hoarding challenge, they simply may not be ready to let go, as they will usually have a very different perspective than you about what’s too much. If their clutter is causing fire, falling, or other hazards and you feel the need to help them immediately, it’s still extremely important to be patient and not pushy. If this person in not responsive to you, pick up books from the library on the topic and learn about the many options for professional help. If you attempt to tackle things on your own, consider these important tips:
Avoid trying to persuade them to get rid of things. It often leads to arguments, the person closing up to the possibility of you helping at all, and can damage your relationship with him/her.
Use encouraging verbal and body language. Be supportive and communicate with positive and genuine words and actions when discussing the situation. Be careful and aware of your tone of voice.
Highlight strengths. If you begin working with someone to downsize, see the whole person and don’t be concerned with problems in the home, but rather the effort to change.
Treat this person how you want to be treated. With love, kindness, respect, and encouragement, you can be of assistance in many ways. You may one day hold the honorable title of being the trusted friend or family member there when they are ready to let go, or who guides them to seek professional help when the time is right. But first, they must be ready and willing to help themselves.
A variety of helpful information, research, and resource information on the topic of hoarding can be found in The Hoarding Handbook available online and through your public library.
Discard what you don’t need and it magically creates space that makes cleaning and organizing easier. Let go of the old and unnecessary, expired, used up, what upsets you, what’s no longer your style, and that which takes up space you need for something more meaningful. It’s time to say goodbye and move on…
Step One – Declutter the Junk Drawer
Clear off a nearby surface on which to place things coming out of the drawer.
Gather one or more paper grocery bags for discards. Label one “Hazardous/E-Waste.” Have another bag handy to carry things that need to live elsewhere in the house. Keep the trash and recycle bins nearby. Read about what is considered Hazardous Waste and how to properly dispose of it.
Prep a bottle of all-purpose cleaner or mild soap, and a clean sponge or rag.
Grab a pen and pad of paper for notes, or use the notepad on your cell phone.
Open the junk drawer and take a few “Before” photos.
Prepare to Drop Off Household Hazardous and e-Waste
One of the safest ways to dispose of old batteries, lightbulbs, cords, wires, and other types of electronic “e-waste” is during drop-off days that local businesses, schools and community organizations host throughout the year. You can also go to Earth911.com or do in Internet search for a “household hazardous waste center” to find drop-off locations near you. Whether you rent or own, most waste management companies have special directions for you to follow to properly dispose of hazardous waste locally to you and often free of charge, check your local waste management company’s website for details.
Now that you know how to properly handle hazardous and e-waste…
Take everything out of the drawer. Toss what you no longer want into the trash, recycle bin, in a donate/giveaway pile, or into the “hazardous waste” bag. Don’t know if the batteries are good? Watch this Youtube video for a quick way to check.
Is there anything in the drawer that belongs elsewhere in the house or garage? If so, take it where it needs to be.
Step Two – Clean
Clean inside the drawer with a wet and warm, soapy cloth. Allow the surface to dry completely before putting things away. You may want to put down drawer liner to protect the surface from future damage. Spongy liner works great for keeping things from rolling around.
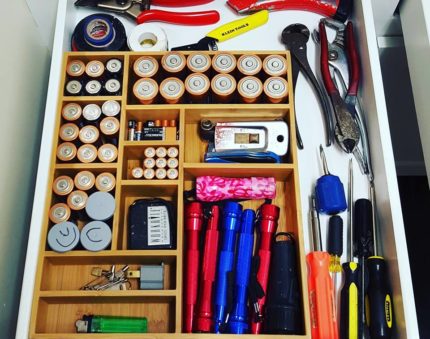
Step Three – Put Things Back and Organize Your New “Utility” Drawer
Creatively reuse small boxes for office and utility supplies. Use old jewelry gift boxes, iphone boxes, or colorful business card boxes like these.
Now that you are cleaning out the drawer, is there anything left to go back in it? What should an organized “Utility” drawer consist of?
Useful items for a “Utility” drawer may include a screwdriver, scissors, pliers, utility knife, marker, pen, notepad, a few rubber bands, small roll of tape, small ball of twine, small flashlight, fresh batteries, safety pins, tweezers, tape measure, lighter or matches, small emergency sewing kit, a few band-aids, a couple small binder or chip clips.
If you continue to keep chargers, cords, or wires in the drawer, roll up and keep them in check with a rubber band or velcro cord strip.
Return what belongs back to the drawer.
Isabella Guajardo, founder and owner of Bella Organizing, is a San Francisco Bay Area professional organizer offering home organizing, interior redesign, and residential move management services throughout the Greater San Francisco Bay Area. Call (510) 229-7321 or email info@bellaorganizing.com for more information. Gift certificates are available.
2. to organize and prioritize (one’s commitments, material possessions, etc.)
3. to let it go
Declutter First, Organize Next.
Pulling out what you no longer want is key to creating space and will make the organizing process smoother. Whether it’s clothing from a hanger, shoes from a rack, books from a shelf, paper from a filing cabinet, or toys from a bin, it’s time to make decisions on the things you are ready to let go. Focus first on decluttering. When the unwanted is out of the way, begin cleaning and organizing.
*** Read both steps before getting started, and choose how you will like to proceed. If you have a lot of food to go through and are limited on time, break the process up into the DECLUTTER step now and the CLEANING & ORGANIZING step later. ***
Step One
Declutter the Pantry and Food Cabinets
Take a “Before” photo of the pantry or food cabinets.
Have on hand plenty of plastic trash or paper bags for 1) trash, 2) recycling, 3) compost 4) give away/donate items
Prep a bottle of all-purpose cleaner or mild soap, and a clean sponge or rag.
Grab a pen and pad of paper for notes.
One area at a time, pull out the old and expired food from the kitchen cabinets, pantry, refrigerator/freezer, even the emergency kit (make a list of what needs immediate replacement in the kit.) You may have heard that labels offer “suggested” expirations, but are you willing to take that chance?
Compost expired food and recycle the packaging. If you have non-expired, non-perishable dry food you want to give away, set it aside in the “donate” bag.
Make note of what you are buying too much of and prevent future waste.
Step Two
Clean and Organize the Shelves & Cabinets (can be done the same day or another)
If you didn’t already take everything out during the declutter process, do it one cabinet or shelf at a time. Place on a nearby table or countertop surface. Start sorting and place like with like. Your brain is making an important mental note of what you own.
Sort like items – soups, grains, beans, breads, snack foods, baking items, spices, breakfast items, drink (tea, coffee, cocoa, etc.) Keep like with like to find things faster and avoid buying duplicates.
Wipe empty food cabinets and pantry surfaces with a wet and warm, soapy cloth or all-purpose cleaner. Crumbs and goop accumulate over time, like on that bottle of honey. Keep ants and critters from sniffing out the goods and protect your cabinets with regular cleaning. Allow to completely dry before putting things away.
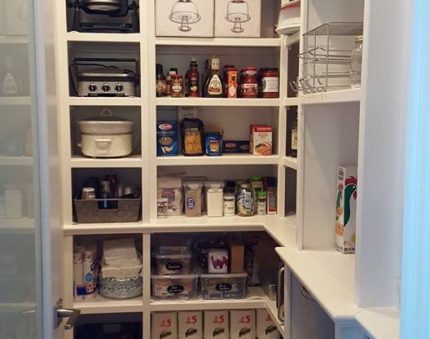
Put away like items together, labels facing forward when possible. Think “grocery store display.”
Take an “After” photo of your organized pantry & food cabinets.
Feel like getting a little more organized around the kitchen? Read up on how to make a Drink Zone.
Isabella Guajardo, founder and owner of Bella Organizing, is a San Francisco Bay Area professional organizer offering home organizing, interior redesign, and residential move management services throughout the Greater San Francisco Bay Area. Call (510) 229-7321 or email info@bellaorganizing.com for more information. Gift certificates are available.