Declutter First, Organize Next.
Discard what you don’t need and it magically creates space that makes cleaning and organizing easier. Let go of the old and unnecessary, expired, used up, what upsets you, what’s no longer your style, and that which takes up space you need for something more meaningful. It’s time to say goodbye and move on…
Step One – Declutter the Junk Drawer

- Clear off a nearby surface on which to place things coming out of the drawer.
- Gather one or more paper grocery bags for discards. Label one “Hazardous/E-Waste.” Have another bag handy to carry things that need to live elsewhere in the house. Keep the trash and recycle bins nearby. Read about what is considered Hazardous Waste and how to properly dispose of it.
- Prep a bottle of all-purpose cleaner or mild soap, and a clean sponge or rag.
- Grab a pen and pad of paper for notes, or use the notepad on your cell phone.
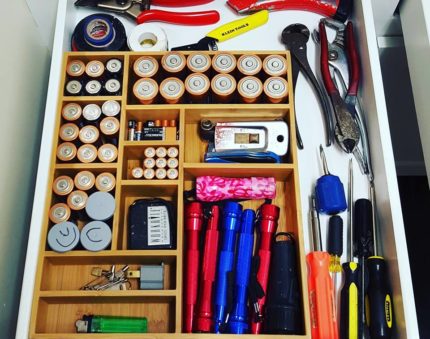
- Open the junk drawer and take a few “Before” photos.
IMPORTANT REMINDER: Old and expired batteries and any kind of cords or wires, working or not, is hazardous waste and should not be thrown in the trash, recycle bin, or poured down drains. Take the following steps and avoid putting mother earth in danger.
Prepare to Drop Off Household Hazardous and e-Waste
One of the safest ways to dispose of old batteries, lightbulbs, cords, wires, and other types of electronic “e-waste” is during drop-off days that local businesses, schools and community organizations host throughout the year. You can also go to Earth911.com or do in Internet search for a “household hazardous waste center” to find drop-off locations near you. Whether you rent or own, most waste management companies have special directions for you to follow to properly dispose of hazardous waste locally to you and often free of charge, check your local waste management company’s website for details.
Now that you know how to properly handle hazardous and e-waste…
- Take everything out of the drawer. Toss what you no longer want into the trash, recycle bin, in a donate/giveaway pile, or into the “hazardous waste” bag. Don’t know if the batteries are good? Watch this Youtube video for a quick way to check.
- Is there anything in the drawer that belongs elsewhere in the house or garage? If so, take it where it needs to be.
Step Two – Clean
- Clean inside the drawer with a wet and warm, soapy cloth. Allow the surface to dry completely before putting things away. You may want to put down drawer liner to protect the surface from future damage. Spongy liner works great for keeping things from rolling around.
Step Three – Put Things Back and Organize Your New “Utility” Drawer

- Now that you are cleaning out the drawer, is there anything left to go back in it? What should an organized “Utility” drawer consist of?
- Useful items for a “Utility” drawer may include a screwdriver, scissors, pliers, utility knife, marker, pen, notepad, a few rubber bands, small roll of tape, small ball of twine, small flashlight, fresh batteries, safety pins, tweezers, tape measure, lighter or matches, small emergency sewing kit, a few band-aids, a couple small binder or chip clips.
- If you continue to keep chargers, cords, or wires in the drawer, roll up and keep them in check with a rubber band or velcro cord strip.
- Return what belongs back to the drawer.

Isabella Guajardo, founder and owner of Bella Organizing, is a San Francisco Bay Area professional organizer offering home organizing, interior redesign, and residential move management services throughout the Greater San Francisco Bay Area. Call (510) 229-7321 or email info@bellaorganizing.com for more information. Gift certificates are available.