Categories
Professional-Organizer

Six Simple Steps To Get Organized

rid-pet-hair-downsize-minimalize-newton
My boy Newton. He owns and loves but a few simple toy, but we have the most fun hiking together in the East Bay Regional Park hills.

Getting organized doesn’t happen overnight. 

It’s a process or a “lifestyle change” that develops and improves over time.  The more action you take toward an organized lifestyle, the more time you will have for family, friends, hobbies, life goals, and yourself. With faithful practice, you will become more organized. Here are six simple steps to get you started:

  1. Pick a zone
  2. Make a list
  3. Sort like items
  4. Give Away/Sell/Donate
  5. Organize
  6. Congratulate yourself

1. Pick a zone. 

Choose a room or area of that room where with a little decluttering and organizing you will get instant gratification. Don’t try to tackle the entire garage or house in one day…stick with a SMALL area of one room, such as one small closet or cabinet. Focus on getting this area completely organized just the way you want it. The positive feeling of SUCCESS helps to keep us moving toward our goals.

2. Make a list.

Prioritize projects to complete within that zone before moving on to another (1., 2., 3., etc.). For example, if decluttering and organizing a pantry:

  1. Pull out and compost old and expired food
  2. Wipe down shelves with a cleaning solution
  3. Arrange food into categories
  4. Make a list of food that needs to be replaced and/or organizing supplies to pick up that will help streamline the pantry.

3. Sort like items.

Do you have multiples of something you prefer to store in this zone in different areas around the house? Bring them together. Don’t stray too far! Stick with organizing this zone. Finding things that don’t belong here? Put them in a pile and find them a home later or drop them off in the general area that *should* be their home and leave them there for now. You’ll fine tune later. Get back to sorting your priority zone. Do a little dusting while here.

4.  Give Away/Sell/Donate. 

Gather paper or plastic grocery or trash bags, cardboard Amazon or moving boxes, and label them accordingly for Give Away, Sell, and Donate. Fill them with things found in this zone that you want to bestow upon someone you know and love (Give Away), things you would like to make money back on (Sell) and things you don’t want that aren’t worth the time to sell but still have a little life in them (Donate). Place a Recycle and Trash bin or bag nearby, in case you come across this stuff in the process. #4 is an optional but very important step to de-cluttering and downsizing. 

5.  Organize. 

Place items where it makes the most sense to you. Should everything in this zone be tidied up and left here or taken somewhere else in the house where it makes more sense to be? Did you find keys that should instead hang on a hook by the door, or go in a specific drawer in the kitchen? Did you happen upon a set of winter gloves that should go into a drawer in your dresser, or into each jacket pocket so they are instantly there when you need them? (I leave mine in my jackets and LOVE always finding them there.)

6.  Congratulate yourself for coming this far.

Great job! You completed organizing a zone. Now set up a date with yourself to tackle another zone and add to the accomplishments.

Isabella Guajardo has provided professional home organizing and residential move management services to hundreds of individuals and families from all walks of life including single parents, school teachers, college professors, lawyers, doctors, Pulitzer Prize winners, and CEOs of Fortune 500 companies. The thing 90% of them have in common? Too much stuff they were ready to downsize. Bella Organizing helps you to tackle and reach your declutter and organizing goals.

Call (510) 229-7321 to schedule a complimentary telephone consultation.
Categories
Professional-Organizer

Closet organizing made simple – maximize your space with better hangers

How to Use Skirt/Pant Hangers

I do a lot of closet organizing and see a variety of home made and professional installation systems. Even the biggest and most well-designed closets can have organizational problems. What if you have a tiny closet or simply too many clothes like most of us? A quick and easy fix-it starts with analyzing the type of hangers you are using.

We accumulate a variety of  hangers over time: colorful plastic tubes, bulky wood, padded sweater and metal dry cleaning hangers are common.

Tube hangers are sturdy, inexpensive, easy to acquire, and are used for just about everything: blouses, t-shirts, sweaters, dresses, folded over pants and skirts. If you have collected a variety of these colorful hangers…beware! It makes the closet look messy and clothes tend to slide off their smooth surface. Plastic is a material I suggest be phased out of the home whenever possible, and considered primarily for garage, attic and basement storage containers, and areas where liquids can spill and permanently damage the container. If you already have or prefer plastic tube hangers, use the same size and color for visual consistency; this alone will make the closet look and feel more organized.

Padded sweater hangers are meant to prevent stretching at the shoulders, but I have witnessed stretching on them anyway. These hangers also take up a lot of space and can be difficult to slide across a hanging bar when searching through the closet. The key to preventing hangers from stretching sweaters at the shoulder is to 1) wear them regularly, and/or 2) fold and stack sweaters instead of hanging.

Organize My Closet
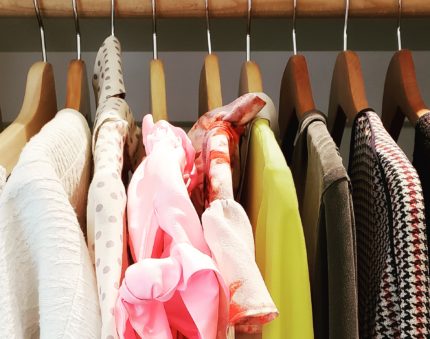
Wood hangers are good to use if you have the space. Whatever material they are made of, consistently sized, shaped and colored hangers give the closet a sleek and minimalist look and feel.

Wooden hangers look nice, are sturdy, and one of the natural materials I prefer for the home. They work best for large and heavier clothing, suits and jackets in a hallway entry closet, but tend to use up too much space in a wardrobe closet. Stick with slimmer hangers where you can.

What about dry cleaner hangers? Why bother transferring clothes onto regular hangers when they are already hung when picked up from the cleaners? Dry cleaner hangers are slim and sleek, therefore take up little space…as long as they don’t bend and tweak out of shape. If you wear the same dry-cleaned clothes every week it makes sense to consider using them as your regular hangers (please at least remove the plastic bag covers!) If your clothes will be hanging for a while, transfer them onto better hangers, for safe storage and aesthetics. Otherwise, your clothes may lose their shape quicker. Typical dry cleaner hangers also bend out of shape quickly and snag other clothing.

Slim hangers of the same size and color give the closet a sleek, minimalist look and feel. The ones I like to use have a velvety finish, chrome or nickel hooks, and a good shape to the shoulders, which helps keep clothes from stretching and slipping to the floor. They work well for most lightweight shirts, blouses, and tanks, and are almost completely flat allowing you to hang many items close together, creating space where there was none.

Here is a similarly slim hanger made of a rubber material which I prefer for extra large and heavy men and women’s clothing. They work well for coats and jackets, too:

Cascading hangers with clips further maximize space. They allow pants and skirts to hang their full length, keeping them wrinkle free. The ones shown here have a small hook to hang them on one another, allowing you to maximize vertical space. These hangers keep their shape over time and can hold a lot of weight without collapsing, unlike plastic tube and dry cleaner hangers.

Do you or your partner have neck ties that need proper hanging? See my quick video below where I demonstrate one of my favorite tie hangers and how to use it.

Choosing the right hangers can create space where you did not know you had it. Slim hangers, wooden hangers, and cascading pant and skirt hangers are great choices for streamlining your wardrobe closets for function and aesthetics. Maximize space by adjusting the type of hangers you have; it is an easy and inexpensive way of making the most of a small closet without sacrificing style or durability.

____

Ready for more? Call (510) 229-7321 today to schedule a complimentary estimate for your closet and wardrobe organizing goals. Gift certificates are available.

Keep up with Bella Organizing on Facebook and Instagram.

How to Use A Tie Hanger
Categories
Professional-Organizer

5 Home Organizing Mistakes To Stop Making

Kids_Room_declutter_organize

If you are like many people, you dream of finding time to get started on a few home organizing projects. Here are 5 common mistakes to avoid and tips to stay on task and be productive:

#1 Trying to get another adult organized.

I often get calls and email from thoughtful family members, friends, and neighbors asking for help for someone they love that’s living a cluttered life. The disorganized person may or may not live with them. If you want to help someone declutter and get organized, start by gently letting them know why you are concerned, that professional organizers exist if they are interested in getting help, and then live by example.

If you are living with the cluttered person and it bothers you, have a gentle talk and make an agreement to set space boundaries where they put their stuff, and you put yours. If it’s a shared home office, draw an imaginary line down the middle of the room and keep your things on one side, and theirs on the other. Then keep your area neat and organized and tune out the others persons space. Yes, learn to TUNE IT OUT. Your own organized space can become an inspiration for the cluttered person to get their act together. In time, they may start looking to you for advice or help.

If someone asks you to help them get organized and you agree, it’s important to not push them to get rid of things, which can start a serious argument and damage a relationship. You need to earn their trust over time if you want to be effective, which can take great patience on your end. Read this article before beginning to work together. If it’s a serious clutter or hoarding situation that violates health codes or puts you and/or another person in danger, contact a specialist for advice. Bella Organizing assists with light levels and borderline hoarding, but for serious issues, consider learning more about the topic and gather resources through the American Psychiatric Foundation.

#2 Thinking you can organize everything at once.

An organized home isn’t built in a day. Getting organized is a process, a lifestyle change that is learned, develops and improves over time with regular practice, much like getting your body fit and toned. You may clean and organize a certain area of the house one day, but then it’s back to its cluttered state a week later if you have not kept up the cleaning. Instead of doing a big job all at once every six months (or years), get in the habit of cleaning and organizing an area a little at a time and more often. For example: your desk. Take 15 minutes at the end of each day to file paperwork and clear it of the days clutter. Set your phone alarm for daily reminders or put a big sign above your desk to remind you. Clean and organize one small space 15 minutes daily for 21 days in a row and magic will start to happen. Learn to love the process of organizing as well as look forward to the end goal.

#3 Organizing without letting go.

It’s a fact of life that we collect stuff. Like squirrels and nuts, we hunt and gather and fill our homes with wonderful goods. As more things enter the home, we find ways to store them in closets, cabinets, drawers, and buy new bins and baskets. The baskets and spaces start to fill and spill over. Time for another basket, closet, or storage unit?

No. It’s time to purge through what you have before thinking about another trip to the Container Store. Getting organized isn’t only about containing things, it’s about learning and practicing clutter prevention methods, and regularly letting go of things you never or rarely use. Every time you clean up, encourage yourself to let go of a couple things that are of no use to you and/or others in your home and take up valuable space where peace and clarity can reside instead.

#4 Allowing toys and kids clothes in the house without setting rules & guidelines.

How much do you remember owning when you were a kid? When you were 18, or 25? When younger, you don’t care quite as much about owning lots of things as you will when an adult. If you’re a parent with a child’s room or house filled with toys, clothes, and kid clutter, really think about how and why it got there. Who bought the toys? Who allowed these things inside the house over the years? Think back to the simplicity of childhood, how you didn’t need but a few, special things to make you happy.

Most kids are too young to understand the concept of feeling cluttered, and will live in it feeling weighed down without realizing they have a choice to live without it (recent studies have shown that collecting and hoarding can be learned in the home!) Help prevent scattered kids stuff and take a load off your kids themselves by not allowing any more children’s clothes or toys into the house until you’ve made some solid declutter decisions and set rules & guidelines together for a healthy in/out exchange.

#5 Organizing without a plan of action. 

When’s the last time you jumped into a home organizing project without taking time to think about what you are doing and why? How did it turn out? How much better do you think the experience could have been or the process a bit more efficient with a little planning? Avoid rash actions that result in an argument with your housemates, partner/spouse, or kids, get organized faster, and enjoy longer lasting effects by setting goals and making a plan you independently or collaboratively work on over time. Use my free downloadable Action-Plan-Template to get started. Complete it yourself or together, stick it on the refrigerator or somewhere else that makes the most sense for it to be, and start making things happen…

Action-Plan-Template.doc
Categories
Professional-Organizer

Home Workshop Makeover

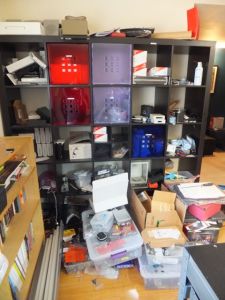
office-organizing-before

Storage shelf mayhem (BEFORE)Home-workshop-organizing-before-2

The Transformation…

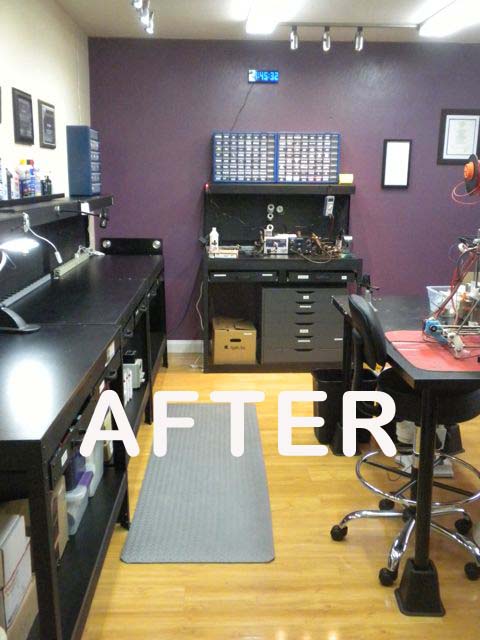
office-organizing-after

We started with an on-site consultation and planning session to develop goals and a timeline for getting my client’s workshop organized. I assessed the project would take 2-3 sessions depending on how much homework he did between them.

The first session consisted of sorting, purging, and cleaning for a day.

Next, I re-assessed the space to include room redesign plans. Based off what the client decided to keep, what we could reuse, and what needed to be acquired, I created a resource and supply list. The client agreed to be in charge of purchasing items needed to move forward.

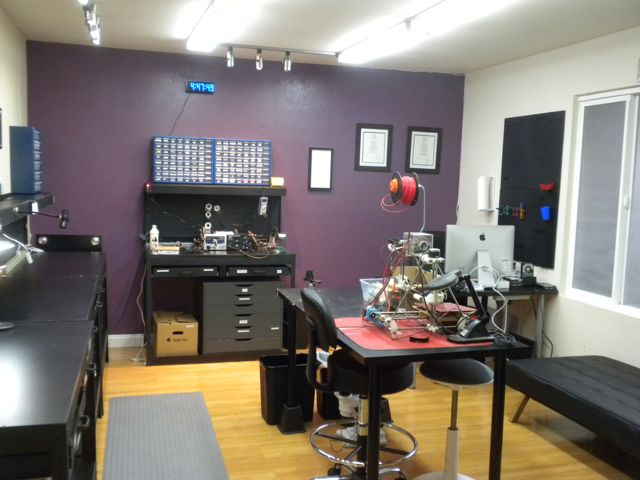
I knew the room would function and flow nicely with workstations against the wall, opening space in the center for a project display table. I designed an area for a desk facing the room where he can oversee his domain while working on the computer.

There was not a comfortable space to sit and relax, so a lounge area was planned by the window.

There was not overhead lighting, so we planned for a variety of light sources including tabletop lamps.

The stark white room needed a splash of color, and I knew Plum Wine would do the trick on the far wall.

More “after” photos

All four work stations were moved against the wall. Projects were sorted, given their own bin, labeled and placed underneath to keep tabletops free of clutter until it was their time to come out. Task lighting was placed at each table:

 home-workshop-organizing-4

Provided with placement suggestions and resources, my client saved quite a bit of money by acquiring and installing LED spotlights and additional overhead lighting himself:

workshop-organizing-lights

Tools and commonly used supplies were organized into labeled drawers. My client preferred LOTS of labeling so he can get into the habit of putting things back where they belong. He even made his own drawer dividers. Additional project and supply bins are placed underneath:

 home-workshop-organizing-5

Small electrical supplies were sorted, organized, and labeled. Below is the soldering station with tools and supplies:

 home-workshop-organizing-5

Alphabetizing makes things easy to find. We reused some labels and created lots more that were previously hand-written:

 home-workshop-organizing-6

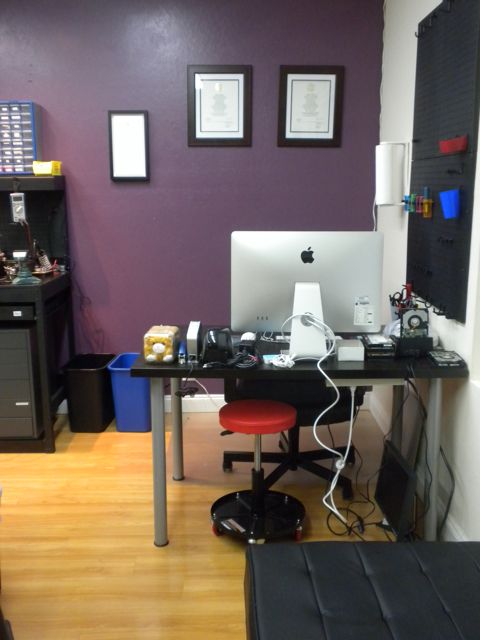
Using an extra table in the room, a computer desk was set up. Degrees and awards were placed on the wall behind it. A black leather lounger, just the right size for the space, was acquired and placed by the desk and window. A new, more comfortable desk chair and rolling stools were purchased. My client obtained the seating, and saved money by painting the wall himself. He did an excellent job!

 home-workshop-organizing-8

An organized & redesigned home workshop.

 home-workshop-organizing-10

This project was one of my favorites. Why? Because the client was an action-taker, did his homework on schedule, and did it well! It took a 2-person Bella Organizing team 2 sessions to redesign, clean, and organize. We hauled away 1.5 truckloads of e-waste including hundreds of cords and wires, old chairs and misc. to be donated and recycled. With the help of a very motivated client in charge of purchasing, lighting installation, and painting, this home workshop is now ready to roll.

Gift Cards Are Available.

Follow our projects on: Facebook | TwitterInstagram | Houzz

Categories
Professional-Organizer

Paperwork Organizing Tips

Paperwork organizing may be challenging for you, but it doesn’t have to be. I have taken control of my paperwork over the years by working on it a little at a time, sometimes daily, sometimes weekly.

The key for me is to deal with mail as soon as I walk in the door. I walk to the kitchen, stand over the recycle bin and drop in whatever I don’t need. I open mail and immediately recycle envelopes and inserts… I filter out most paper clutter before it hits a surface. I then put bills and correspondence on a designated work area, my desk, instead of on the kitchen or living room table.

I’m concerned about my name and address going into the recycle bin, so I tear off and shred it. I also have an identity theft protection rubber stamp that I use at my desk, like this one pictured from Solutions.com ~ you can also get it on Amazon and at Bed, Bath and Beyond.

Identity Theft Protection Stamp

If you get a lot of junk mail, go a step further by starting a shoebox size bin in which to collect unwanted mail, catalogs and advertising for a few weeks, and schedule a date on your calendar to call and get off those mailing lists. If you don’t want to make the calls, have Catalog Choice do it for you. You’ll start receiving less paper mail, which means less clutter to deal with later.

What do I do with the paperwork that begins to pile up on my desk?

Each night I sit at my desk and file away what I need to keep as reference. If you practice this daily for a few weeks, you can form the habit, really you can! It’s ok if you miss a day or two. But get back to it on day three.

I use a cork board on the wall in front of my desk to pin up small notes and important reminders. I take down and file or recycle weekly anything that no longer applies. Here’s an example of a DIY cork board from Apartment Therapy…

corkboard paperwork organizing
DIY Corkboard from Apartment Therapy

Don’t let bills and important correspondence go out of sight, out of mind. If not dealing with it immediately, create a specific area where you place and see them daily, such as standing upright in a desktop file folder, or pinned to a corkboard on the wall by your work area. Highlight or circle due dates on bills.

Desktop file holder from Containerstore.com

Paperwork and receipts it’s a good idea to keep:

  • Adoption paperwork, birth certificates, marriage license, divorce documents
  • Car titles, repair and maintenance receipts.
  • Personal identification, social security statements.
  • Educational degrees and certifications.
  • Home improvement paperwork and receipts.
  • Insurance documents for current policies.
  • Medical receipts and reports.
  • Warranties and manuals: things you still own.
  • Receipts for high value home or office furniture, computers, electronic equipment, household goods, art, anything you may one day want to sell or may need for value reference in the case of a home or renters insurance claim.
  • If you’re holding onto department store receipts in case you want to make a return, but the return date is expired, do you still need to keep the receipt? Sometimes yes, many times no.
  • Any kind of tax document. When the year is up and it does not need to live in my active files, I store them with that years tax return in a closet designated specifically for this kind of storage. Since I run a business, my CPA requires that I receive all work-related receipts, bank and credit card statements in the paper format. But I’ve set myself up to get personal statements and receipts electronically. I log on regularly to pay bills and take a glance for funny business. So far, so good!

More ways to prevent paper pile up:

  • Go paperless wherever you can.  NOW is the time. Get online and learn how to receive statements, bills and receipts via email. Learn how easy it is to download and store them onto your computer as a digital document. If you ever need a paper copy, simply print from your digital storage file. Consider going paperless with one or two minor bills first. If you find this works for you, practice with other things. A little at a time steadily builds new habits.
  • When signing up for something or ordering online, be sure to uncheck boxes that allow the business to send you paper mailings or catalogs. It’s easier to remove yourself from email than mailing lists down the line.

We have individual needs to consider when it comes to dealing with paperwork. For this reason, I suggest consulting with your CPA or legal advisor about what you should be keeping vs. recycling or shredding. From my own home office and that of many clients I have worked with over the years, what I have found is this: we are quite more similar than different. So do not feel alone with your paper clutter! Deal with it a little at a time, and on a regular basis. If you’re not going to hire a professional organizer or personal assistant to come in weekly and do it for you, learning to self-maintain is key. Like good habits, getting organized with paperwork is something that can be learned.

Ready for more? Call (510) 229-7321 today to schedule a complimentary estimate to get your paperwork or home office organized. Gift certificates are available.

Keep up with Bella Organizing on Facebook and Instagram.