Categories
Professional-Organizer

Spring Cleaning Advice from the Experts

home-kitchen-organizing-professional-organizer

Bella Organizing collaborated with Redfin Realty and other cleaning and organizing experts to bring you Spring cleaning tips.

As the days grow longer and the weather begins to warm, we start to see the first signs of spring in the air. If you live in New York, Portland, or anywhere in between, the signs of spring are the same – the flowers begin to bloom and the birds are chirping again. After all, spring is the season of new beginnings, so why not refresh your home with spring cleaning? Declutter and deep clean the interior and exterior of your home before spring has sprung with these expert tips. Read more…

Categories
Professional-Organizer

Declutter Jewelry, Purses, and Accessories

declutter

1. to remove mess or clutter from (a place) 2. to organize and prioritize (one’s commitments, material possessions, etc.) 3. to let it go  

Declutter Jewelry

  • that is broken and you have no intention to repair immediately
  • so outdated you haven’t worn it in years
  • the Ex gave you that makes you cry to see it
  • that hurts to wear in any way…those painful earrings!
Jewelry Organizing
Jewelry is a work of art. Care for, display, and wear it with pleasure.

Declutter Purses

  • that don’t fit the bare minimum of a wallet, cell phone, and keys
  • that make you look like a teeny bopper when you’re a grown adult
  • that are not functional no matter how cute
  • clean out purses filled with clutter. Do this every time you change handbags.
purse_organizing_declutter_decluttering
Fill purses with tissue paper to keep their shape. Shelf dividers keep them upright, in view, and accessible

Declutter Belts

  • that haven’t fit in eons
  • because your body has changed and shifted, and no longer wears them well
  • you use for spanking the kids – it’s bad karma and probably illegal these days
socks_organize_declutter_decluttering_bella
Roll belts and place in a drawer organizer to keep them in shape and looking good

Declutter Hats

  • with stains and sweat marks you cannot remove
  • with holes, rips, tears you will not repair immediately
  • too big or small for your head
  • no longer your color or style
  • no longer serving their purpose when on your head
cute_hat_organizing
Surprise, it’s me! In my favorite hat custom made by Elwin Crawford of O’Lover Hats in Oakland. I store it in a beautiful hat box that came with it.

Declutter Gloves

  • that are tattered, stretched, and no longer comfortably serving their purpose
  • too tight or large – give them to someone in need whom they will fit
gloves_declutter_decluttering_organize
Keep gloves together and within reach

Declutter Scarves

  • no longer your color or style
  • with rips and tears you cannot repair or hide
  • that no longer serve their purpose of keeping you warm or looking good
scarves_declutter_decluttering_organize_bella
Roll scarves and place in a hanging bin, basket, or drawer for easy access

More Ideas

jewelry_declutter_organizing_bella
Creative jewelry display made from an old picture frame, mesh cloth, ribbon
jewelry_dislay_organizer_declutter_decluttering_bella_organizing
Display jewelry on a hanging tree

Bella_Organizing_Best_Professional_Organizers_San_Francisco_Oakland_Berkeley_silicon_valley_monterey

Isabella Guajardo, founder and owner of Bella Organizing, is a San Francisco Bay Area professional organizer offering home organizing, interior redesign, and residential move management services throughout the Greater San Francisco Bay Area. Call (510) 229-7321 or email info@bellaorganizing.com for more information. Gift certificates are available.

Categories
Professional-Organizer

Declutter Shoes

Clear the old out and make room to breathe.

As with clothing, when I acquire shoes, I have a rule to let go of as many pairs as I bring in to make room for the new. It’s tough! But reality is, many of us only wear a few favorite pairs and let the others sit to gather dust.

Let ’em go when…

  1. They are worn to the breaking point, the sole or heal is warped, torn, or coming off and you’re not willing to drop them off at a shoe repair shop this week to fix.
  2. They have not bedazzled your feet for a year or two. Like clothes, if shoes are not worn over the last winter, spring, summer, nor fall, they probably never will be. Do you own a pair of special occasion shoes? Have you worn them lately? Are they covered with dust so thick you can no longer tell the color? Are they still in style?
  3. They are no longer your color, size, style, or worth the pain. No longer your color? Are they a style from an era long past that you shouldn’t be revisiting? Has the size of your foot changed? Do they hurt your feet? There’s no such thing as a “break in period” with shoes, in my opinion. If they hurt on day one, they don’t belong on your body. Your feet are precious, and bad-fitting shoes can do serious damage.
  4. They are ugly or dirty beyond cleaning. We are known to buy things we don’t truly like because it’s on sale, or keep something that was a gift and feel bad at the thought of getting rid of it. “What if Aunt Wanda comes over and doesn’t see me wearing them?” Aunt Wanda probably gave you the shoes she bought on sale for herself and realized she didn’t like them when she got home. “They just need to be shined and they will look great!” If so, now is the time to take out the polish and get the job done, or drop them off at the shoe repair shop this week for a professional cleaning.

When it’s time to let go…

Step One – Declutter

  • Take a “Before” photo of your shoe space.
  • Prepare the floor or a large nearby surface to place shoes onto. Use an old sheet or blanket you’re willing to get dirty if using the bed.
  • Have on hand plenty of bags for donations or consignments.
  • Grab a pen and pad of paper for notes or use the notepad on your cell phone (“Take shoes for cleaning and repairing.”)
  • Prep a bottle of all-purpose cleaner, a rag, broom, or vacuum cleaner.
  • Grab a shoe brush and the shoe polishing kit. Don’t have one? A clean, soft rag will do.
  • Go through each pair of shoes, and put what you no longer want in the “Donation” or “Consignment” bags. Set aside each pair you keep.

Step Two – Clean

  • Dust, sweep, mop, or vacuum the area where you will put the shoes back. So many dust bunnies! Dust is made up of dead skin cells, pet dander, dirt you’ve trekked in on your shoes, pollen, and other things from outside. This is a reason why so many people have “no shoes” rules in their homes.
  • Dust each pair of shoes thoroughly with a shoe brush or clean rag. Do this outside or out an open window. You can also gently vacuum dust from inside each shoe with an attachment hose.
  • If you have time, polish the shoes that need it most before putting them back. Or set those aside to be professionally cleaned, polished, or to repair.

Step Three – Organize

  • If going back onto a shelf, rack, or the floor, display shoes front forward as you find them in a department store.
  • If you need to maximize space, place one shoe forward and the other in the opposite direction, heel showing. This magically creates space both on shelves and in hanging shoe nooks. Try it!
  • Still not enough room? Place sandals and flats upright in a basket to store on a shelf or the floor.
  • Use an under-bed shoe organizer that zips closed and is easy to quickly slide out to grab what you need.
  • Roll up old magazines and place inside tall boots to help keep their shape.
  • Take an “After” photo of your fresh and organized shoe space.

Considering selling or consigning unwanted shoes? Read about my favorite places to do that!


Bella_Organizing_Best_Professional_Organizers_San_Francisco_Oakland_Berkeley_silicon_valley_monterey

Isabella Guajardo, founder and owner of Bella Organizing, is a San Francisco Bay Area professional organizer offering home organizing and residential move management services throughout the Greater San Francisco Bay Area. Call (510) 229-7321 or email info@bellaorganizing.com for more information. Gift certificates are available.

Categories
Professional-Organizer

Declutter the Medicine Cabinet

Declutter First, Organize Next. 

Discarding what you do not need is key to creating valuable space that will make cleaning and organizing easier. Let go of the old, expired, outworn, used up, what upsets you, what’s no longer your style, and that which takes up space you need for something more meaningful. It’s time to say goodbye and move on…

 Declutter the Medicine Cabinet
medicine_cabinet

Step One 

  • Prepare a nearby tabletop surface on which to place things when removing them from the cabinet. Avoid bending down and putting items on the floor whenever possible (saves the back).
  • Gather one or more paper grocery bags for discards. Label one “Hazardous Waste” and another “Donate” (for items still in good condition that you plan to give away.)
  • Prep a bottle of all-purpose cleaner or mild soap, and a clean sponge or rag.
  • Grab a pen and pad of paper for notes, or use the notepad on your cell phone in case you come up with a thing or two for your “To Do” list.
  • Open the medicine cabinet and take a few “Before” photos.

IMPORTANT REMINDER: Old and expired medicine AND vitamins is hazardous waste, and can turn into something potentially dangerous. You can’t just flush them down the toilet or toss them in the trash. Take the following steps and avoid putting anyone or anything – people, kids, pets, fish in the ocean – in danger.

earth_911_logo

Drop them off…

One of the safest ways to dispose of old medicine and vitamins is to take advantage of drug drop-off days your city or local community organizations host throughout the year. The U.S. Environmental Protection Agency recommends drop-off events as the first choice of disposal for over and under the counter drugs, including vitamins. Do an internet search for ones near you or go to Earth911.com for independent drop-off locations. When dropping off anything with your personal information on it, be sure to black out your name and address with a marker. DO NOT black out the drug name, since hazardous waste facilitators need to know what it is. And DO NOT mix a lot of different drugs into one small unmarked bag, for the same reason.

Take them back…

Take unwanted and expired drugs or vitamins back to the store where you bought them if your city or town doesn’t hold drop-off events or if there is not a household hazardous waste collection center near you. If the store has an on-site pharmacy, the employees may be able to properly dispose of them. Speak to your local pharmacist about it.

Do not ever, ever, EVER…

Do not flush old or expired medicine or vitamins down the toilet, cautions the EPA and FDA. While this is a high concern with prescription medications, vitamins can also leach into the water supply and cause safety risks. Don’t dispose of them down drain pipes nor empty them into a garbage or compost bin. Children and animals can get into and eat them.

Lots of other things are stored in medicine cabinets, and many do not have expiration dates. These can include hairspray, hair gel, toothpaste, lotion, face toner, contact lens solution, sunscreen, deodorant…all of which should be considered for disposal, too. How old are they? Do you ever use it? Do you even like it? If it does not have an expiration date and you’ve owned it for more than two years, consider it old. If it’s not face or body soap, nor earth-friendly cleaning fluids meant to go down the drain, it should not go down the drain. Play it safe and place anything else old and unwanted into the hazardous waste bag. Personally, I consider anything made with scientifically named chemicals hazardous waste, and always include it in my next visit to the household hazardous waste center. If anyone’s going to dispose of these things the safest way possible, it’s them.

Now that you know how to handle the discards…

  • Pick up each item in the medicine cabinet and find the expiration date. If it’s expired, it goes into the “hazardous waste” bag. Don’t take chances with old vitamins, medicine, or anything you put in or on the body.
  • Place anything you are keeping on a nearby surface for later.

Step Two 

Clean 

  • Inside and out, wipe the empty medicine cabinet with a wet and warm, soapy cloth. Regular cleaning will keep it in good shape. Allow surface to dry completely before putting things away.


Step Three 

Put Things Back and Organize

  • Return what you keep back to the cabinet, place like items near each other, labels facing forward: medicine, vitamins, hair products, face products, etc.
  • Take an “After” photo of your freshly organized medicine cabinet.
Was this a quick and easy project for you? Are you motivated to declutter more from the bathroom? If so, tackle all the shampoos, conditioners, soap, make-up, and toiletries under the sink, in the shower, or stashed in other areas of the home.

Bella_Organizing_Best_Professional_Organizers_San_Francisco_Oakland_Berkeley_silicon_valley_montereyIsabella Guajardo, founder and owner of Bella Organizing, is a San Francisco Bay Area professional organizer offering home organizing, interior redesign, and residential move management services throughout the Greater San Francisco Bay Area. Call (510) 229-7321 or email info@bellaorganizing.com for more information. Gift certificates are available.

Categories
Professional-Organizer

Home Workshop Makeover

office-organizing-before

Storage shelf mayhem (BEFORE)Home-workshop-organizing-before-2

The Transformation…

office-organizing-after

We started with an on-site consultation and planning session to develop goals and a timeline for getting my client’s workshop organized. I assessed the project would take 2-3 sessions depending on how much homework he did between them.

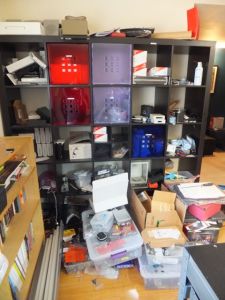
The first session consisted of sorting, purging, and cleaning for a day.

Next, I re-assessed the space to include room redesign plans. Based off what the client decided to keep, what we could reuse, and what needed to be acquired, I created a resource and supply list. The client agreed to be in charge of purchasing items needed to move forward.

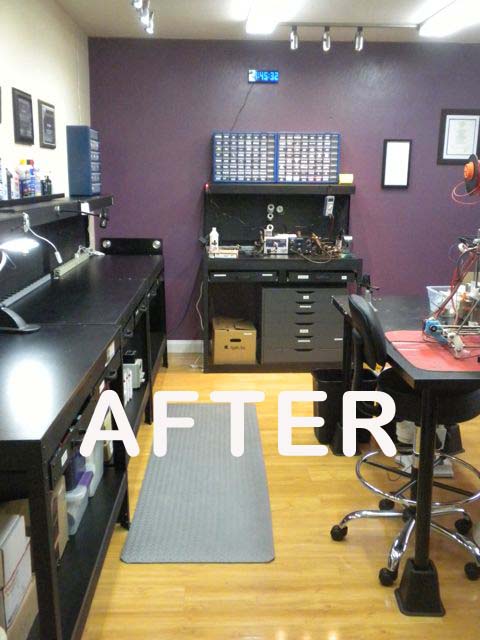
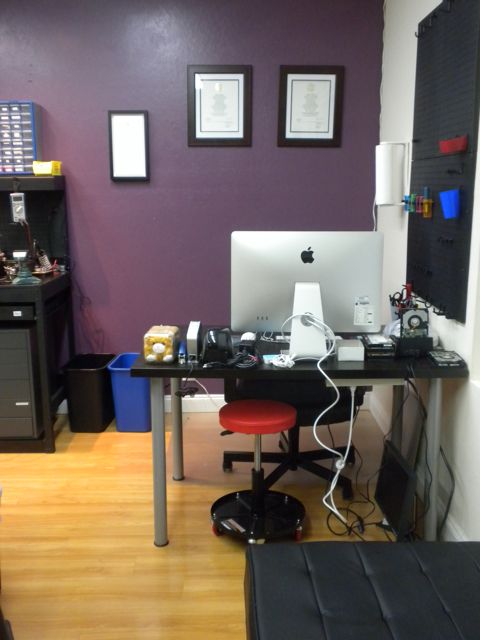
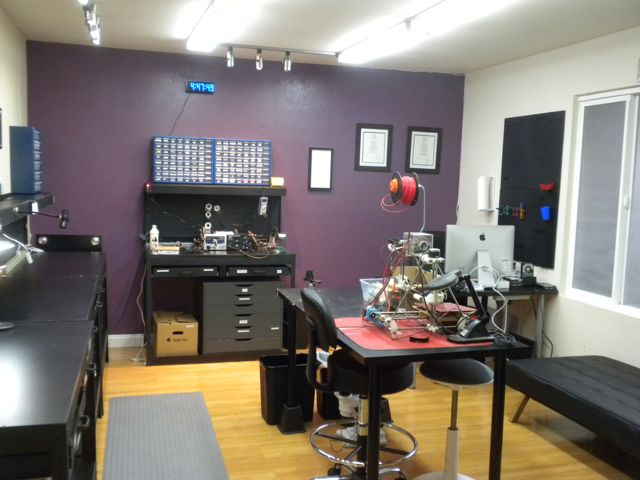
I knew the room would function and flow nicely with workstations against the wall, opening space in the center for a project display table. I designed an area for a desk facing the room where he can oversee his domain while working on the computer.

There was not a comfortable space to sit and relax, so a lounge area was planned by the window.

There was not overhead lighting, so we planned for a variety of light sources including tabletop lamps.

The stark white room needed a splash of color, and I knew Plum Wine would do the trick on the far wall.

More “after” photos

All four work stations were moved against the wall. Projects were sorted, given their own bin, labeled and placed underneath to keep tabletops free of clutter until it was their time to come out. Task lighting was placed at each table:

 home-workshop-organizing-4

Provided with placement suggestions and resources, my client saved quite a bit of money by acquiring and installing LED spotlights and additional overhead lighting himself:

workshop-organizing-lights

Tools and commonly used supplies were organized into labeled drawers. My client preferred LOTS of labeling so he can get into the habit of putting things back where they belong. He even made his own drawer dividers. Additional project and supply bins are placed underneath:

 home-workshop-organizing-5

Small electrical supplies were sorted, organized, and labeled. Below is the soldering station with tools and supplies:

 home-workshop-organizing-5

Alphabetizing makes things easy to find. We reused some labels and created lots more that were previously hand-written:

 home-workshop-organizing-6

Using an extra table in the room, a computer desk was set up. Degrees and awards were placed on the wall behind it. A black leather lounger, just the right size for the space, was acquired and placed by the desk and window. A new, more comfortable desk chair and rolling stools were purchased. My client obtained the seating, and saved money by painting the wall himself. He did an excellent job!

 home-workshop-organizing-8

An organized & redesigned home workshop.

 home-workshop-organizing-10

This project was one of my favorites. Why? Because the client was an action-taker, did his homework on schedule, and did it well! It took a 2-person Bella Organizing team 2 sessions to redesign, clean, and organize. We hauled away 1.5 truckloads of e-waste including hundreds of cords and wires, old chairs and misc. to be donated and recycled. With the help of a very motivated client in charge of purchasing, lighting installation, and painting, this home workshop is now ready to roll.

Gift Cards Are Available.

Follow our projects on: Facebook | TwitterInstagram | Houzz